


I've had many people ask how to sew in a gusset, so today I will show you how I do it. It's very simple to do, so let's get started................
How do we get this into that?
 First open up the area that the gusset will be going into and match one end of the gusset to the seam.
 Now pin the gusset all the way around from seam to seam or point to point, lining the points up with the seams at either end. Use as many or as few pins as you are comfortable with.
 We will be begin sewing at one end at the center of this point, which will be the center of the seam.
 Here I've folded the fabric away, so you can see what I'm talking about. The pink stitch on the blue you see there is the center starting point.
 Ok, here we go stitching along our first edge. I like to use the edge of my presser foot for my seam guide, which is roughly a 1/4 inch. Don't forget to pull out the pins as you go. Stitching over a pin can cause broken needles and even worse if you hit one just right it can throw the timing of your machine off and then you won't be able to sew and off to the repair shop you will go--guess how I know!
 Here we are stitching merrily along on our way to the first finish line!...........
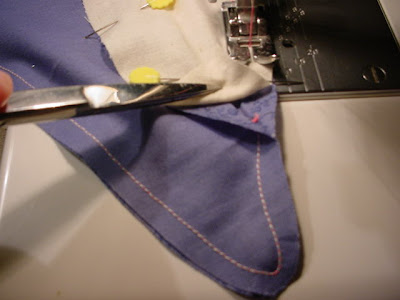
 Stitch all the way to the point--where the scissors are pointing--this will be in the middle of the seam, just like at the beginning.
 Just another view of where we're heading. What it looks like underneath that fabric............
 And we're there! Take one or two backstitches.............
...and pull the piece out from the machine. Clip your threads.............
 Put the gusset back under the machine--starting at the end you just sewed to and begin again just like you did on the other side. The scissors are pointing to where we will begin..........
 La, la, la, la, la, la here we go, stitching away.....isn't it easy! I told you it would be!
 Almost home! See the stitching where we started. Keep going.........
 And we're there! Backstitch once or twice, pull the gusset out from the machine and clip your threads.
 There now wasn't that easy! You're ready to clip the edges, so it will lay nicely once you turn it right side out. Well done! You get an A!
 When making a gusset on a bird or something similar I do not like to leave my stuffing opening in the gusset area. I prefer to cut a slit underneath a wing or some other such place, but that is personal preference and you may find a totally different way that works for you and that's the way you should do it. There aren't too many rules. Just find what fits and works best for you and do it that way. Now go and stitch up a whole flock of birds and Happy Stitching!
How do we get this into that?
 First open up the area that the gusset will be going into and match one end of the gusset to the seam.
 Now pin the gusset all the way around from seam to seam or point to point, lining the points up with the seams at either end. Use as many or as few pins as you are comfortable with.
 We will be begin sewing at one end at the center of this point, which will be the center of the seam.
 Here I've folded the fabric away, so you can see what I'm talking about. The pink stitch on the blue you see there is the center starting point.
 Ok, here we go stitching along our first edge. I like to use the edge of my presser foot for my seam guide, which is roughly a 1/4 inch. Don't forget to pull out the pins as you go. Stitching over a pin can cause broken needles and even worse if you hit one just right it can throw the timing of your machine off and then you won't be able to sew and off to the repair shop you will go--guess how I know!
 Here we are stitching merrily along on our way to the first finish line!...........
 Stitch all the way to the point--where the scissors are pointing--this will be in the middle of the seam, just like at the beginning.
 Just another view of where we're heading. What it looks like underneath that fabric............
 And we're there! Take one or two backstitches.............
...and pull the piece out from the machine. Clip your threads.............
 Put the gusset back under the machine--starting at the end you just sewed to and begin again just like you did on the other side. The scissors are pointing to where we will begin..........
 La, la, la, la, la, la here we go, stitching away.....isn't it easy! I told you it would be!
 Almost home! See the stitching where we started. Keep going.........
 And we're there! Backstitch once or twice, pull the gusset out from the machine and clip your threads.
 There now wasn't that easy! You're ready to clip the edges, so it will lay nicely once you turn it right side out. Well done! You get an A!
 When making a gusset on a bird or something similar I do not like to leave my stuffing opening in the gusset area. I prefer to cut a slit underneath a wing or some other such place, but that is personal preference and you may find a totally different way that works for you and that's the way you should do it. There aren't too many rules. Just find what fits and works best for you and do it that way. Now go and stitch up a whole flock of birds and Happy Stitching!
My little chickadee bird pattern is available in E Pattern form HERE


