Monday, July 18, 2016

Where Blogger's Create ~ 2016 ~ Welcome to My Sewing Room!


 Welcome to my sewing room! 

I am dusting off my old blog and joining 
Karen Valentine of My Desert Cottage's Where Bloggers Create. 
At the very bottom you will find a link to the blog event and be able to view all of the wonderful, creative spaces bloggers have shared.

Ok, so let's begin the tour......... 

(click on the photos to enlarge)

This is my current sewing room. It had an overhaul about 6 months ago and believe me it really needed it!

 I wanted to face my sewing machine out into the room instead of against the wall. 
It definitely works so much better.
The table in the middle of the room is an old enamel top kitchen table that I use as a cutting table. 
Each side has a leaf that folds out and up to extend the work space.   
It sits on bed risers to help make it the perfect height for cutting.
I added a skirt around it to hide the tub of "stuff" underneath.

 A view of the room towards the windows. The room has plenty of great natural light.
Please ignore any dust and the un-vacuumed floor (the vacuum thinks it is on vacation and refuses to work).


 The other end of the room has a wall full of built in drawers and cabinets. 
Awesome for storage!
I'm not crazy about the black, but the room is light enough it's not overpowering. One of these days I  hope to paint it and add a little valance to the top of the closet opening and add a skirt to the cabinet sitting inside. It will eventually be another ironing station. 


Closer view of the wall with the "damn shelf". I call it that, because it always finds a way to fall off the wall and dump its contents. Luckily nothing has ever broken and I fixed it by screwing cup hooks into the wall and the shelf and it hasn't went anywhere in about 3 years now. I think I won. LOL! 


I have always planned to paint this shelf pink, but I am thinking that may never happen. 


Close up of the shadow box frame. I had all these little trinkets that needed a home and my oldest daughter Jennalee (The Papered Soriee on IG) put it together for me.  


Annabelle Angel a Dee Foust piece that watches over the sewing room. 


 Top of the little white hutch. One of the clocks in my clock collection. I have a thing for clocks working, non-working, parts missing. This one I found on a recent trip to Salt Lake City in a thrift store for just a couple of bucks and it does work.


Inside of the little white hutch. It holds some of the pretty little journals and cards etc. that I like to collect.


Middle section of the little white hutch. 


The other wall. This is where I craft etc.


Bulletin board with artwork from my daughter and few other people.


Close up of the hutch area.


My very first sewing machine from my childhood.


A little stitchery I made several years ago.


The view from where I sit and sew. So much better than facing the wall! 


A mini design wall I am trying out that sits next to my sewing machine. 
I am currently working on a Farm Girl Vintage quilt designed by Lori Holt. 
Don't look too close as they are far from perfect. 
I am also thinking I am going to make this just a tad bit bigger and add a nice edge to it. 


The little cabinet at the end of my sewing table holds this cute little vintage Singer Spartan. It sews like a charm! 

Thank you for joining me on this tour. 
I hope that you have enjoyed your stay.

To see more of my sewing rooms--same stuff for the most part, just different set ups in different homes over the years, follow this link HERE

To see even more sewing rooms, art studios etc. from other bloggers click HERE to go to Karen's blog.

Thank you Karen, for hosting this fabulously fun blogging event! 


Wednesday, January 8, 2014

My Basket Mini-Quilt

Just a little something that I've been working on. I haven't done any quilt projects for quite awhile now, because I've been so busy sewing for other people filling orders. I had so much fun with this little quilt and I love how it has turned out so far. The quilting and binding still need to be done. 


This is from the pattern called Civil War Baskets from the book Remembering Adelia by Kathleen Tracy. The book is filled with lovely civil war era miniature quilts to make and the patterns are very simple and easy to follow. Well I better get busy and try to finish this up.

Thursday, December 12, 2013

A Little Christmas Decor

The house is all decorated and ready for Christmas. It's rather simple, but not overwhelming that way. 


I decided to decorate the mantle with Nativities this year. I was needing to start all over with some of my decorations after having lost some of them. 

This nativity I found at the thrift store for $3.00. The little glass nativity also for $3.00--which I have plans to paint silver. The nativity board was a find from T.J. Maxx. 
 

 I just love the star and the angel! The star was a thrift store find again for that magic $3.00 and the angel was made by an online friend Linda Matson.


 I love my little Nicole Sayre angel! Found at the thrift store just last week for $1.95! The candle behind her I scored from Kohl's last year for $5.00. So I guess I have a rather thrifty theme going on here as well.


 The main Christmas tree, tall and skinny! Loaded with mostly handmade ornaments. And the tree topper (which needs to be uprighted) is my little paper star from my tutorial found HERE.


A little spot in the dining room. The peppermint candies I bought and used last year, saved them and using again this year and they still look new and fresh! 


 I don't know what the little blue and white pieces are called. I know there's a name for their style and I just love them! I pick them up whenever I find a piece.


Favorite Santa plate.
 

The gingerbread tree.


 Little tree in the laundry room. It has a rusty star that sits at the top, but I guess I didn't put it on before snapping a picture. The homespun tied to the clothespins remind of little angels. It wasn't planned that way, they just happened.


I love my Santa mug collection! I do not like this black shelf they are sitting in. That will be a paint project come spring.


A little tree in the bathroom. The tree was .99 and the ornaments were 1.00, the pearly strand pulled from my craft supply and a favorite vintage pendant for the topper.

That's it for now. I hope you enjoyed this simple little tour. Merry Christmas!

Friday, December 6, 2013

Making Pancakes in the Oven

First just let me say I am not a food photographer---as you will clearly see. 
I am also the world's worst pancake maker. 

I can cook and bake, but forget pancakes. Then I decided hey, why not see if they can be baked instead of fixed on the griddle and sure enough they can and so now I can make pancakes! 


 Preheat the oven to 375. Then following your favorite pancake recipe, mix them up. I used my favorite mix--Krusteaz Blueberry Pancake mix.I used the 2 cup recipe. I think a larger batch would be too much at one time. 

Line a 9x13 baking dish with parchment paper--or just butter it well, pour in the batter and bake for 10-12 minutes.


And you're done! As you can see they do not brown. I did turn on the broiler for about 2 minutes (since this was a glass dish I left it on the bottom rack) and all I got were little cracks, so just go with the no brown. Although I might try brushing them with a bit of butter the last few minutes of baking time next time. 


And if your brain says that pancakes have to be round then use a large cookie cutter and voila! Round pancakes. These baked up to be a big, fluffy 1 inch tall--yup I measured. The only thing they need is some berry syrup and some sausage. Or bacon. Or both.

So now I can make pancakes--my way! 

Bon Apetite!

Monday, December 2, 2013

Wire Coat Hanger Christmas Ornament Wreath-DIY

 I was in need of a quick and inexpensive Christmas wreath for my front door, so I headed to the thrift store,  only to find there were no wreaths at all, BUT there was a big bucket of glass Christmas balls. 12 for .49, so I found about 2 dozen and headed home. I decided to try making a Christmas ball wreath using a wire coat hanger. I had made one using a wreath base before (more on that later), but not a coat hanger. I did need more ornaments, so I headed to the dollar store and bought 5 more tubes of plastic balls in red, green and pearly silver. And this is the result......................


 I also bought the big, red, glittery bow at the dollar store. Love that bow! 
(and yes a spring project will be to paint that door!)

I'm not posting a tutorial on this, but HERE is a nice little tutorial you can follow found at My Girlish Whims.

I will give you some tips however:

1. Glue on all the tops of the balls whether you think you will need to or not--you will need to--believe me!

2. It is far better to use plastic balls than glass balls. Save the glass balls for a wreath made with a wreath base. 

3. Depending on how full you want it, will depend on how many balls you use. I used roughly 50, but if you see the wreath below, made by my daughter she used about 70.

4. Use a heavy wire hanger, not some whimpy hanger or your wreath will sag and not keep its shape.

5. It is windy here today and I have no storm door, so to keep my wreath from banging against the door I used some double sided foam sticky tape--like you use for scrapbooking--and put it on three balls that make contact with the door. No more wreath whipping around on the door.

6. Also I cheated and stopped adding balls about 3 or so inches from each end of the wire, so I could pull my wreath back together and get it to connect. After I got the ends wired back--a bit challenging!--I wired more balls on over that area to help fill it in and then the big bow hides what you can't see! 


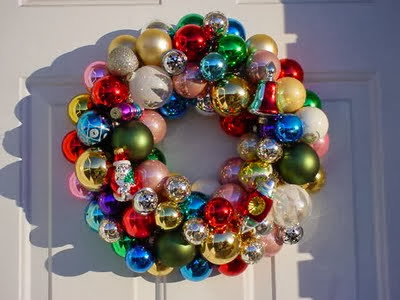
This big beautiful wreath was made by my daughter Jennalee and was also made with a wire coat hanger. She used about 70 balls instead of the 50 that I used and you can see how much fuller it comes out.


This is a glass ball wreath I made several years ago, using all vintage glass ornaments and using a wreath base. I have a TUTORIAL for it HERE. For myself I much prefer this method, because I found it simpler and I had more control over the whole thing. But don't let that discourage you, the wire wreath is good too, this is just my preference. As far as time though I don't think one way is quicker than the other. They both took about the same amount of time to make and they are fun to make and they come out so gorgeous! 

Linking Up To:

Savvy Southern Style--Wow Us Wednesdays

Friday, August 9, 2013

Pincushion Parade

I thought I'd share some of my pincushions today. 

This post was inspired by Gloria Parsons of Olde Green Cupboard Designs. Gloria put together a fun and fabulous pincushion fashion show on her blog the other day and mentioned that if we had any photos to send them to her, but then I realized that maybe I had a few more than she would be interested in, so I thought I'd post them here and then share the link with her. So Gloria please feel free to use any of these photos if you'd like. 

And don't forget to check out Gloria's pincushion show HERE.

In fact I think it would be a fabulous idea if quilt shows would include a pincushion and sewie section to the show for everyone to share these little gems. 

 These photos are taken just as they sit in my sewing room at the moment, stray threads, dust and messes included.


A little corner of pincushions that are for looks only. 


 Vintage linen pincushion with hat and corsage pins.


 The 2 little pincushions I found at a yard sale and this is just how they came and I plan to leave them this way.  One of my favorite things to do when I buy an old pincushion is to squish out all the pins and needles. You'd be amazed at the pins and needles lurking deep inside a pincushion. Use extreme caution! LOL!


 This little beauty made of wool was made for me by a friend years ago and it came with all those gorgeous buttons and bling on it and I've left it as is. I love it!


 I use this wool pineapple pincushion all the time! A friend and I did a pincushion swap years ago and we didn't plan it, but we both made each other the same pincushion in the same colors of wool and they turned out identical!


Two lovely wooly pincushions made for me by friends. I use these all the time! And I have 2 of those fabulous strawberries! 


I love my Henrietta chicken! I've made and sold several of these over the years. She's a perfect size and nicely weighted and just too fun to have in the sewing room. I weight her with crushed walnut shells, then stuff with steel wool and polyfil. The polyfil helps to keep the steel wool from poking through the fabric and gives her a smooth and not bumpy appearance on the outside. I'm trying to find more of this fabric that she's made of--raspberries and hydrangeas--I think is the name. I love her beaded "hair" and feet! 


I love this little cathedral windows pincushion my friend Trudy S made for me. She made a bunch of these using old quilt squares someone had made and that she found at a thrift sale. The bottom side is another cathedral window square, only in green. 


Little primitive annie made for me by a friend in a swap and she stitched my business name across the front. 


 Can we talk pet peeve here. This is a little wool Hello Kitty pincushion I made for my 14 year old daughter and notice how all the pins are pushed all the way down into it--that is my pet peeve! This is her pincushion so she can do that if she wants, but I so don't like it when people feel the need--and they do!--to push MY pins down into MY pincushions. Hands Off! LOL!


 Close up of the basket. A few made by friends, a few made by me and a few vintage hearts.


 The little cat and round tuft pincushions were made by friends and the little star I made.


 More pincushions made by me and friends. The goldy/green tall wool pincushion was one of my first to make and the little shoe with pincushion top is from my Antique Baby Shoe pattern, which can be a pincushion or a shoe for decor or for dolls.


My collection of old and new tomato pincushions. I love these! It's been awhile since I've ran across any while out thrifting, so I hope I find one soon. 

I hope you enjoyed this little piece of my collection. Thank you!